GPSレシーバーとRaspberry PiでNTPサーバーを構築
正確な刻を追い求め~GPSを用いたNTPサーバー~
目次
今までのNTPサーバー
「ntp.nict.jpでいいじゃん」
その通り。普通に正確で可用性もトップクラス。
自分も今まではchronyのアドレスプールは下記で設定していた
・ntp.nict.jp(独立行政法人情報通信研究機構)
・s2csntp.miz.nao.ac.jp(水沢VLBI観測所天文保時室)
・ntp.nc.u-tokyo.ac.jp(東京大学)
※全てminpoll 6 maxpoll 8で設定
運用上全く困る事は無かった。
やろうとしたきっかけ
NTPサーバーを建てた後に末端のWindows端末で状況を確認した時に気付いたことがある。
C:\WINDOWS\system32>w32tm /query /status
閏インジケーター: 0 (警告なし)
階層: 3 (二次参照 - (S)NTP で同期)
階層って何だろうと思い調べたらNTPにはStratum(日本語で階層)という概念があり、
Stratum0→原子時計
Stratum1→原子時計に接続されているサーバー
Stratum2→Stratum1に接続されているサーバー
Stratum3→Stratum2に接続されているサーバー
数字が小さいほど正確なNTPサーバーとなる。
流石に原子時計は自宅に置けないのでStratum0は無理。そうするとStratum1も無理では?
原子時計は宇宙にもある
そうGPSを提供する人工衛星である。GPSによる位置特定には正確な時間のデータが必要であり、そのシステムを構成する衛星には原子時計が内蔵されている。そしてその正確な時刻データを電波に乗せて地上へ送信し続けているのである。
この電波は受信することができればntp.nict.jpと同じ階層=Stratum1を自宅の中に置けるぞ!
買い物タイム
4台目のRaspberry Pi 4をAmazonで購入するところからスタート
Amazonで購入したもの(合計17998円)
・8GB Raspberry Pi 4
https://www.amazon.co.jp/gp/product/B089GSG8Y1/
・microSD 32GB
https://www.amazon.co.jp/gp/product/B0B21BXZ6V/
・GeeekPi Raspberry Pi 4アーマーケース
https://www.amazon.co.jp/gp/product/B084JP98ZM/
・Raspberry Pi 4 USB-C
https://www.amazon.co.jp/gp/product/B07DN5V3VN/
・5M 熱収縮チューブ
https://www.amazon.co.jp/gp/product/B07H17SY19/
秋月電子で購入したもの(合計7480円)
・GPS/GLONASS受信機(Galileo/BeiDou可) u-blox M8搭載 みちびき3機受信対応
https://akizukidenshi.com/catalog/g/gM-14541/
・コネクタ付ケーブル 20cm 40p オスオス
https://akizukidenshi.com/catalog/g/gC-15869/
・FTDI USBシリアル変換ケーブル(3.3V)
https://akizukidenshi.com/catalog/g/gM-05840/
・熱収縮チューブ(スミチューブC 黒)Φ1.5×0.2×1m
https://akizukidenshi.com/catalog/g/gP-06788/
・耐熱電子ワイヤー2m×7色 外径1.36mm(UL3265 AWG22)
https://akizukidenshi.com/catalog/g/gP-06755/
何気に秋月でオンラインショッピングを始めて使った。
家にメスメスのケーブルがあったため、必要な場合は追加で購入が必要かも
組み立て
GPSモジュールのケーブルは1.5mあるため、秋月から買った耐熱電子ワイヤーをハンダ付けしてケーブル長を3.5mにする。ハンダ付けした箇所は1本1本熱収縮チューブを用いて絶縁処理をした上でさらに径5mmの熱収縮チューブに5本のケーブルを通して1本化する。
GPSモジュール→耐熱電子ワイヤー→画像のようにメスメスのケーブルを半分に切ったもの
という順番になる。
オスオスのケーブルを購入したのは、GPSモジュールの設定をするために購入したFTDI USBシリアル変換ケーブルがメス口のためだ。
GPSモジュールの設定
まずはPCにGPSユニットの設定や受信状況の確認ができるツール「u-center」をインストール。
https://www.u-blox.com/en/product/u-center
GPSモジュールのケーブルとシリアル変換ケーブルを接続してPCへ接続。
u-centerを起動して上部のメニューから
「Receiver」→「Connection」→「COM〇(場合により異なる)」
データが流れてくれば補足したGPS衛星のデータが表示されてくる。
ちなみに自分の場合はデータが流れてこなくて確認したところ、シリアル変換ケーブルの接続が違った。
GPSモジュール側オレンジを変換ケーブル側黄色に接続したところうまくいった。
データが流れてくれば設定に移る。
「View」→「Messages View」→「UBX」→「CFG」→「PRT」
Target: 1-UART1
Baudrateを115200へ変更して「Send」
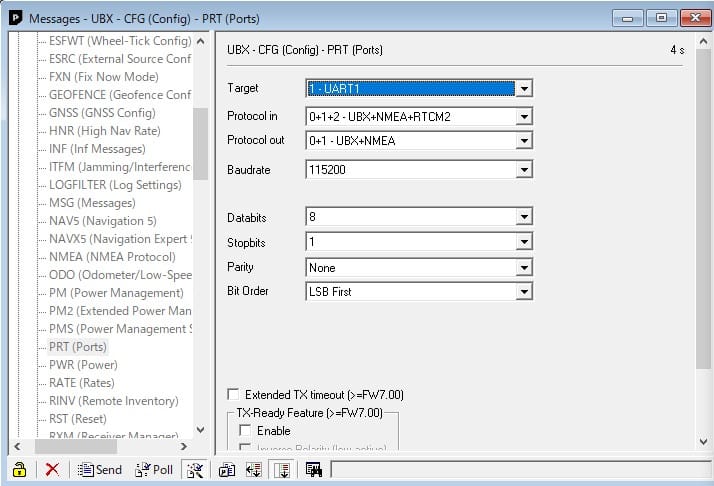
GPSモジュールのレートを変更したため、u-center側も変更する。
上部のメニューから「Receiver」→「Connection」→「Disconnect」で一旦切断。
「Receiver」→「Baudrate」→「115200」
「Receiver」→「Connection」→「COM〇」で再度データが流れてくるか確認。
Raspberry Pi 4のセットアップ
流石に全部書くのが大変なので他サイトを参考にしてください。
今回ラズパイにインストールしたOSはUbuntu22.04LTSとなります。
いつもお世話になっているサイト↓
https://www.server-world.info/query?os=Ubuntu_22.04&p=download
gpsd関連の設定
!!!!注意!!!! 下記の設定の一部は場合により起動不可となります。
参考に設定をする際はご自身の責任でお願いします。
以下は全てsuで実施する。
vi /boot/firmware/cmdline.txt
#console=serial0,115200 dwc_otg.lpm_enable=0 console=tty1 root=LABEL=writable rootfstype=ext4 rootwait fixrtc quiet splash

dwc_otg.lpm_enable=0 console=tty1 root=LABEL=writable rootfstype=ext4 rootwait fixrtc quiet splash
vi /boot/firmware/config.txt
[all]
kernel=vmlinuz
cmdline=cmdline.txt
initramfs initrd.img followkernel

[pi4]
#max_framebuffers=2
arm_boost=1

[all]
# Enable the audio output, I2C and SPI interfaces on the GPIO header. As these
# parameters related to the base device-tree they must appear *before* any
# other dtoverlay= specification
dtparam=audio=on
dtparam=i2c_arm=on
dtparam=spi=on

# Comment out the following line if the edges of the desktop appear outside
# the edges of your display
disable_overscan=1

# If you have issues with audio, you may try uncommenting the following line
# which forces the HDMI output into HDMI mode instead of DVI (which doesn't
# support audio output)
#hdmi_drive=2

# Enable the serial pins
enable_uart=1

# Autoload overlays for any recognized cameras or displays that are attached
# to the CSI/DSI ports. Please note this is for libcamera support, *not* for
# the legacy camera stack
camera_auto_detect=1
display_auto_detect=1

# Config settings specific to arm64
arm_64bit=1
dtoverlay=dwc2

[cm4]
# Enable the USB2 outputs on the IO board (assuming your CM4 is plugged into
# such a board)
dtoverlay=dwc2,dr_mode=host

[all]
dtoverlay=pps-gpio,gpiopin=18,assert_falling_edge=true
dtoverlay=disable-bt
enable_uart=1
core_freq=250
#gpsdをインストール
apt install gpsd gpsd-clients pps-tools
vi /etc/modules
#次の1行を追記
pps-gpio
#gpsdの設定を調整
vi /etc/default/gpsd
# Devices gpsd should collect to at boot time.
# They need to be read/writeable, either by user gpsd or the group dialout.
DEVICES="/dev/ttyAMA0 /dev/pps0"

# Other options you want to pass to gpsd
GPSD_OPTIONS="-n -s 115200"

# Automatically hot add/remove USB GPS devices via gpsdctl
USBAUTO="false"
START_DAEMON="true"
#gpsd.socketを編集
vi /lib/systemd/system/gpsd.socket
[Unit]
Description=GPS (Global Positioning System) Daemon Sockets

[Socket]
ListenStream=/run/gpsd.sock
#ListenStream=[::1]:2947
ListenStream=127.0.0.1:2947
# To allow gpsd remote access, start gpsd with the -G option and
# uncomment the next two lines:
# ListenStream=[::]:2947
# ListenStream=0.0.0.0:2947
SocketMode=0666
#BindIPv6Only=yes

[Install]
WantedBy=sockets.target
#一旦シャットダウン
poweroff
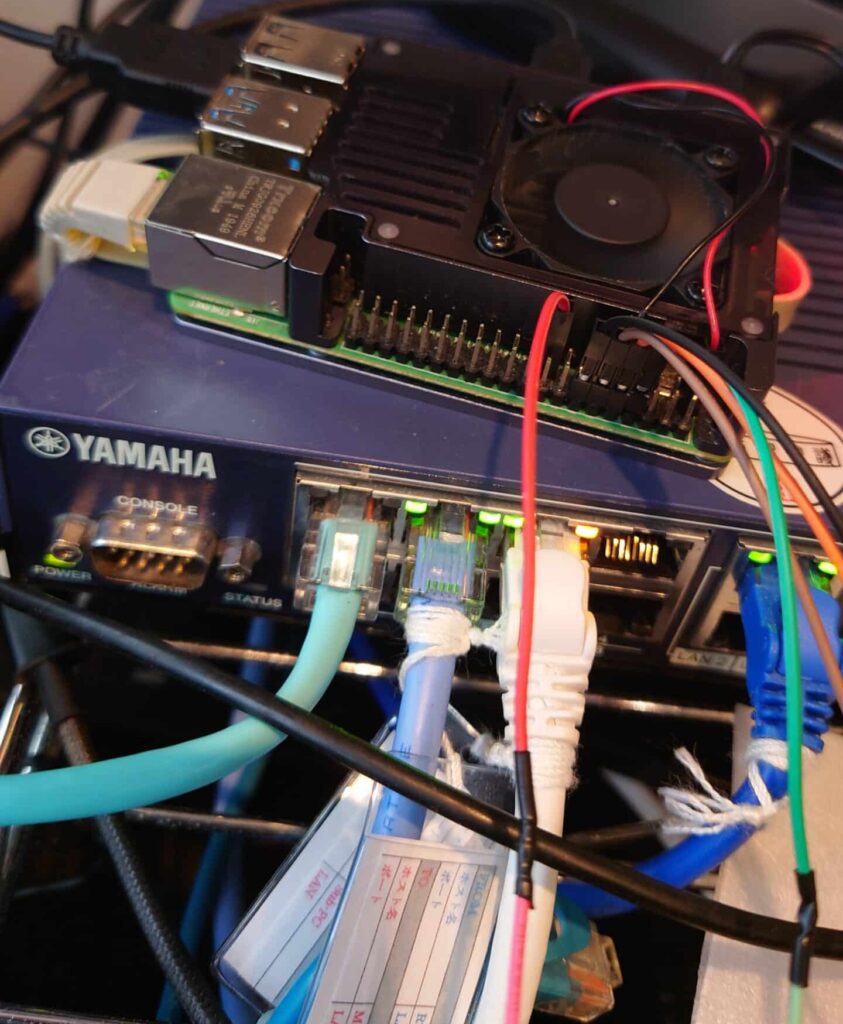
GPSユニットをラズパイに接続
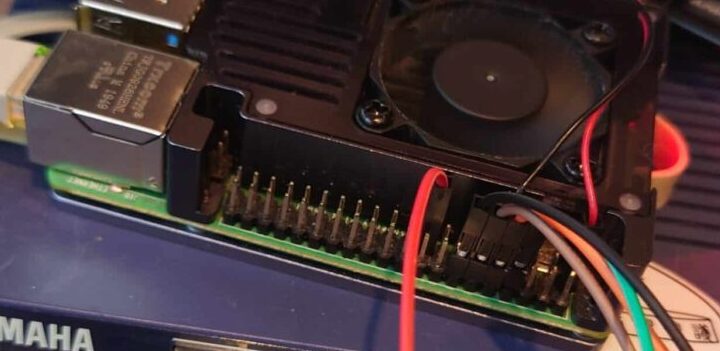
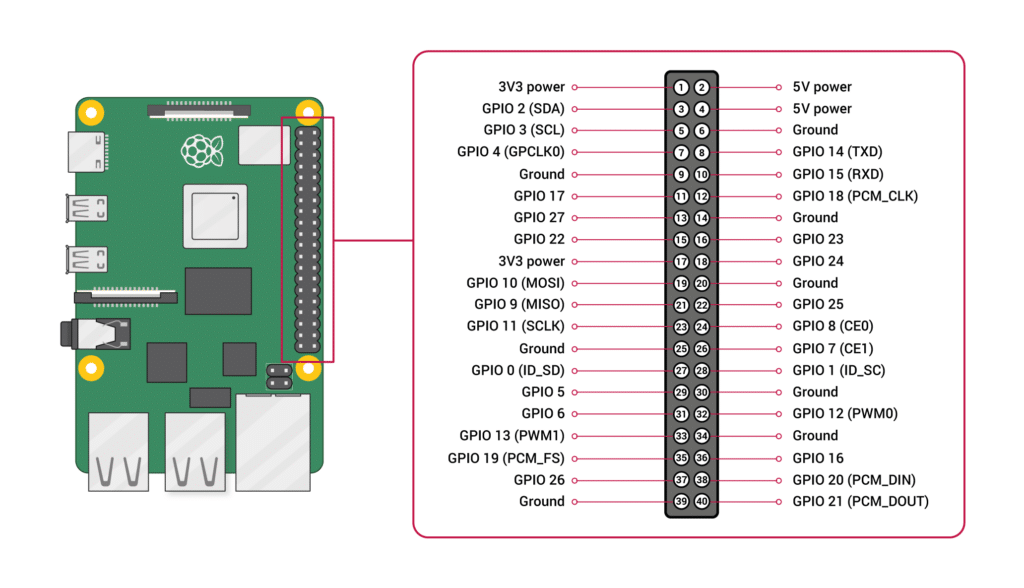
自分の場合は以下のような配線となった
ポート番号・接続先・ケーブルの色
①ケースファン-赤
⑧GPSモジュール-緑
⑨ケースファン-黒
⑩GPSモジュール-オレンジ
⑫GPSモジュール-茶色
⑭GPSモジュール-黒
⑰GPSモジュール-赤
再度ラズパイの電源を投入。
gpsdの起動
※自動起動の設定とともに起動
sudo su
systemctl daemon-reload
systemctl enable gpsd
systemctl start gpsd
systemctl enable gpsd.socket
systemctl start gpsd.socket
gpsdの動作確認
#PPSのテスト
ppstest /dev/pps0
正常な場合は次のように出力する
trying PPS source "/dev/pps0"
found PPS source "/dev/pps0"
ok, found 1 source(s), now start fetching data...
source0 - assert 1696254097.101599833, sequence: 26581 - clear  0.000000000, sequence: 0
source0 - assert 1696254098.101600086, sequence: 26582 - clear  0.000000000, sequence: 0
source0 - assert 1696254099.101600228, sequence: 26583 - clear  0.000000000, sequence: 0
source0 - assert 1696254100.101602592, sequence: 26584 - clear  0.000000000, sequence: 0
source0 - assert 1696254101.101602530, sequence: 26585 - clear  0.000000000, sequence: 0
source0 - assert 1696254102.101603449, sequence: 26586 - clear  0.000000000, sequence: 0
source0 - assert 1696254103.101604369, sequence: 26587 - clear  0.000000000, sequence: 0
source0 - assert 1696254104.101604659, sequence: 26588 - clear  0.000000000, sequence: 0
#いよいよGPSのテスト
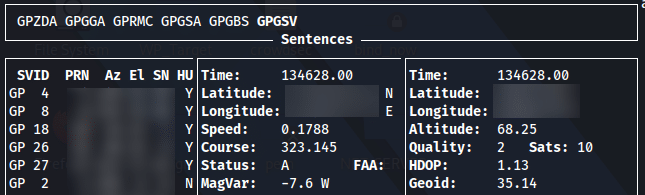
gpsmon -n
正常に受信できていれば下の画像のようになるはず
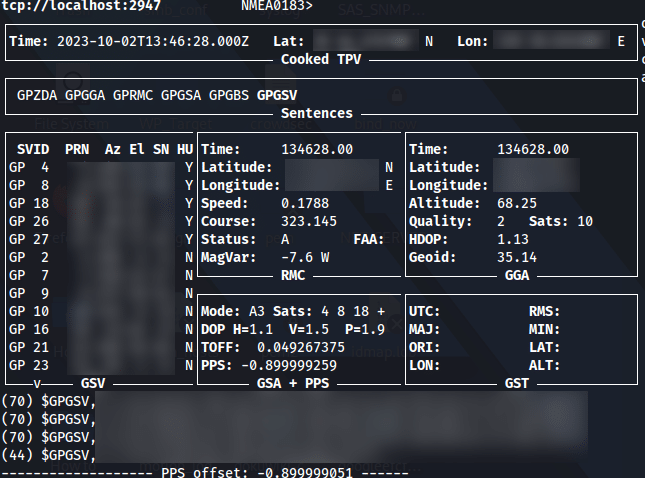
マジでこういう素っ気ない最低限のデザインって最高。
ちなみに枠線が表示されず、代わりにlqqqqqqqqqqqqと文字列になってしまう場合は以下を試すといいかも。
#一度サーバーから抜けてターミナルで実施
echo 'unset NCURSES_NO_UTF8_ACS' >> ~/.bashrc
chronyのインストール
#NTPサーバーとして動作させるためにchronyを導入
apt install chrony
#chronyの設定
confdir /etc/chrony/conf.d
pool ntp.nict.jp minpoll 6 maxpoll 8
pool s2csntp.miz.nao.ac.jp minpoll 6 maxpoll 8
pool ats1.e-timing.ne.jp minpoll 6 maxpoll 8

sourcedir /run/chrony-dhcp

allow 192.168.0.0/16

sourcedir /etc/chrony/sources.d

keyfile /etc/chrony/chrony.keys

driftfile /var/lib/chrony/chrony.drift

ntsdumpdir /var/lib/chrony

logdir /var/log/chrony

maxupdateskew 100.0

rtcsync

makestep 1 3

leapsectz right/UTC

refclock PPS /dev/pps0 lock GPS refid PPS precision 1e-9 offset -0.900 poll 2
refclock SHM 0 refid GPS precision 1e-1 offset 0.047 poll 2
NTP始動
#編集した設定を反映
systemctl restart chrony
systemctl status chrony
● chrony.service - chrony, an NTP client/server
     Loaded: loaded (/lib/systemd/system/chrony.service; enabled; vendor preset: enabled)
     Active: active (running) since Mon 2023-10-02 16:20:53 JST; 1 day 9h ago
       Docs: man:chronyd(8)
             man:chronyc(1)
             man:chrony.conf(5)
    Process: 3460 ExecStart=/usr/lib/systemd/scripts/chronyd-starter.sh $DAEMON_OPTS (code=exited, status=0/SUCCESS)
   Main PID: 3469 (chronyd)
      Tasks: 2 (limit: 4416)
     Memory: 1.3M
        CPU: 38.450s
     CGroup: /system.slice/chrony.service
             ├─3469 /usr/sbin/chronyd -F 1
             └─3470 /usr/sbin/chronyd -F 1
そして時を刻み始める
#現在NTPサーバーで利用されているソースを確認
chronyc sources -v
  .-- Source mode  '^' = server, '=' = peer, '#' = local clock.
 / .- Source state '*' = current best, '+' = combined, '-' = not combined,
| /             'x' = may be in error, '~' = too variable, '?' = unusable.
||                                                 .- xxxx [ yyyy ] +/- zzzz
||      Reachability register (octal) -.           |  xxxx = adjusted offset,
||      Log2(Polling interval) --.      |          |  yyyy = measured offset,
||                                \     |          |  zzzz = estimated error.
||                                 |    |           \
MS Name/IP address         Stratum Poll Reach LastRx Last sample
===============================================================================
#* PPS                           0   2   377     3   -238ns[ -238ns] +/- 2502ns
#- GPS                           0   2   377     2    +36ms[  +36ms] +/-  100ms
^- ntp-b2.nict.go.jp             1   8   377   250  -1917us[-1924us] +/- 4267us
^- 2001:ce8:78::2                1   8   377   217  +1446us[+1440us] +/-   14ms
^- ntp-a2.nict.go.jp             1   8   377   210  -2361us[-2365us] +/- 4037us
^- ntp-k1.nict.jp                1   8   377   229   -441us[ -450us] +/- 9378us
^- 133.40.41.134                 2   8   377    29   +680us[ +679us] +/-   36ms
^- 133.40.41.135                 2   8   377   176    +89us[  +84us] +/-   31ms
^- 133.40.41.136                 2   8   377   216   +414us[ +409us] +/-   30ms
^- 61-114-187-55.secomtrust>     1   8   337   324  -1249us[-1264us] +/- 5627us
一番上のPPSに「*」があるため、現在NTPサーバーは正確な1秒を刻むPPSを参照していることがわかる。
最後に
主役のGPSモジュールだが、現在は3階建の我が家の1階窓際に設置している。
直上に空が見える位置ではないので、みちびきを補足する機会は少ないのが残念なところ。
gpsmon -n で得られる座標を見ていると誤差はおよそ20m以内といった感じだ。
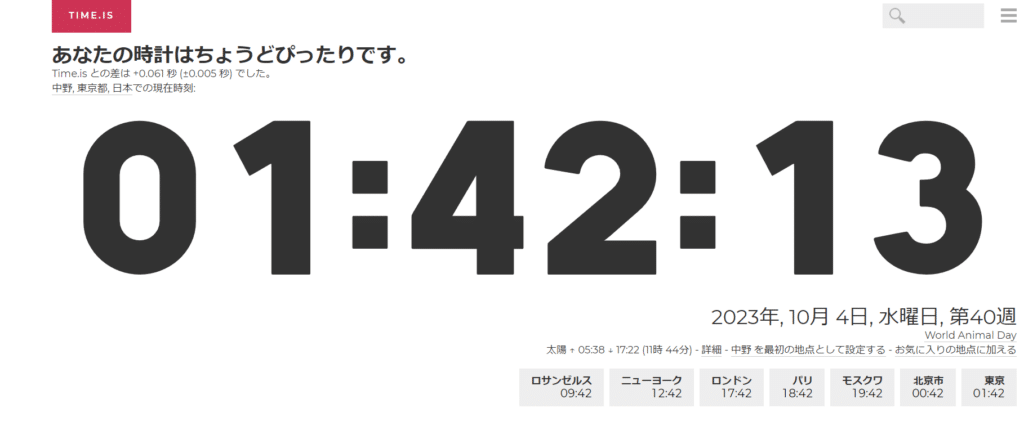
https://time.is/ja/
クライアント側で参照するNTPサーバーをここまでで構築したNTPサーバーのアドレスにした結果↓

- 高木
- ニコラシカ(Nikolaschka) 2025年6月22日
- バルヴェニー・ダブルウッド-12年 2025年6月18日
- 白州12年・ハイボール 2025年6月15日
- ホワイト・ウィッチ(White Witch) 2025年5月17日
- サンバ(Zamba) 2025年4月5日